Barebones FAQ
General Questions and Troubleshooting
Why have I been sent to this page?
You probably asked a question that is answered here. This should have been the first place you came to for answers and much of the information on this page has been written to give as clear an explanation as possible and is likely to be easier to understand than a chat response written quickly.
How come there are no game/ROM/BIOS files on the image?
The purpose of the image is to provide a platform to run your games. If you’re looking for pirated games there are none to be found on this image.
What systems on the image are set up for the lightgun?
3DO, Atari 2600,NES, SNES, PS1, MegaDrive/Genesis, Mega/Sega CD, Master System, Dreamcast, Hypseus-Singe, Actionmax, PnP, C64, Tic-80, Arcade (including MAME, Naomi, Atomiswave and Supermodel)
Is there an image for the Pi3?
No. It’s a work in progress at the moment, but due to extremely low interest this is on hold.
How do I earn the respect and admiration of the community?
Play without crosshairs and don't stretch 4:3 games to widescreen.
When I load up my pi I see all the boot text then I just get a blank screen or just text. Have I done something stupid?
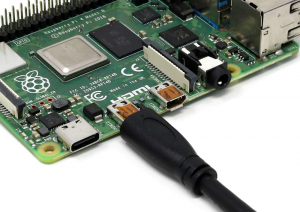
Yes. You’ve plugged the HDMI cable into the wrong port.
Connect the TV to your pi using ensuring that you plug the cable into the micro-HDMI port that is nearest to the USB-C port on the Pi's board. Be mindful that some cases (notably Argon cases) might rearrange the order of the ports, if your pi boots up to a blank screen, or just some plain text, try the other HDMI port.
I started the gun and it works fine in the calibration/test utility but it doesn't work in a game. What gives?
The Calibration is a one time deal, just to hone in the pointer for the crosshairs. After its dialled there's no more need for it. The calibration tool stops the guns when it exits so if you use it you need to start the guns again before you load a game.
The buttons/trigger work, but my gun is not tracking on a Rasp Pi 4. Why?
This may be a camera module issue that we are aware of, but are unsure why it is happening. The solution is to open the sinden driver software v1.08 (not v2.07) on Windows and check the box that says "use old v1.3 firmware." This will downgrade the firmware to v1.3 on the gun, and the gun should now track on your Rasp Pi 4. The only caveat to doing this is, it cancels out the ability to use recoil, on a recoil gun. If this fixes the issue for you, please reach out to the Raspberry Pi team on Discord and let us know you are having this issue, so we can look into a solution for you...or you can contact customerservices@sindenlightgun.com
I can't see any bezels or a border.
Did you follow the advice in the wiki about how your ROMs should be named and where to place them?
I can see bezels, but no border.
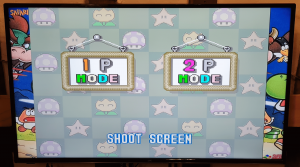
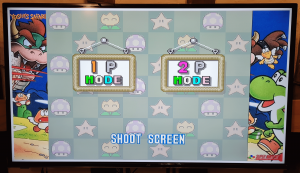
Sounds like your TV is cropping out the edges of the picture. So you need to change some overscan settings.
First check if your TV has settings that disable overscan. If you can't find any then look at the more in-depth guidance on overscan in the section below.
Can I overclock my Pi to get extra performance?
See the section below for advice on overclocking. Be aware that overclocking will invalidate the warranty of your Pi and you do so at your own risk.
I use a 4:3 or 5:4 screen. Is there an easy way to convert Barebones for use with my screen?
Yes. A utility that runs a conversion is available from https://github.com/Widge-5/Sinden_BB_screenratio
Keep in mind that due to personalisation and variation between everybody's systems, it may not be a perfect conversion. Ideally this should be run shortly after a fresh image of BareBones has been flashed.
How to... convert Sinden Barebones 9.x to 4:3 or 5:4 aspect ratio
I need help/support, can you help me?
Read the guides in this wiki, and check out the Video tutorials section.
You can also find help on the raspberry-pi-help channel in the Sinden Discord
More Detailed Guidance
Overscan
Overscan is a behaviour in certain television sets, in which part of the input picture is shown outside of the visible bounds of the screen. It exists because cathode-ray tube (CRT) television sets from the 1930s through to the early 2000s were highly variable in how the video image was positioned within the borders of the screen. It then became common practice to have video signals with black edges around the picture, which the television was meant to discard in this way. Today's displays, being driven by digital signals (such as DVI, HDMI and DisplayPort), and based on newer fixed-pixel digital flat panel technology (such as liquid crystal displays), can safely assume that all pixels are visible to the viewer, but this is not always the case and often a TV will cut the edges off an image in a mistaken effort to remove the "unneeded" edges of the image. You might not realise that your display is doing this until you start a game and notice that you can't see the white border around the edge of the frame necessary for the Sinden Lightgun to work. This might be because your display is positioning the image in such a way that the border is outside of the frame. If you find that the edges of your image are missing, this might be an issue with the way your display handles overscan. As all TVs and monitors are widely different and handle this in different ways, there are several courses of action that you can take. Your TV might have an option to disable/enable overscan. If it does, try toggling it to see if it makes a difference. Some TVs might name this setting clearly with the word "Overscan", but others may not - for example, some Samsung TV's have a picture size option called "Screen Fit", which solves this problem if selected.
If you can't resolve an overscan issue with your TV/monitor settings, then there are settings on the Raspberry Pi which will take care of it. In /boot/config.txt find the section near the top with the four overscan settings. It looks like this:
# uncomment the following to adjust overscan. Use positive numbers if console
# goes off screen, and negative if there is too much border
overscan_left=2
overscan_right=2
overscan_top=2
overscan_bottom=2
Now, just make those numbers bigger to bring that picture back into frame. A good place to start might be with 16 then adjust up or down as necessary. The desired result is to have the image fit neatly inside the frame of your set without cropping out any of it and without creating a new black border around it. It is possible that each of your edges might need different values to achieve it, but this is rare. Remember that each time you make a change you will need to save /boot/config.txt and restart the Pi for it to take effect.
Overclocking
Whilst your Pi, as it is can run many games, there are a few games that would benefit from the extra performance that can be gained from overclocking the CPU and GPU. Bear in mind that the Raspberry Pi is a low-cost computer with limited capability, we've tried our best to get as much working as possible, but an overclock may be necessary for some of those outliers.
As overclocking will void the warranty on your Pi, we've taken the view that the decision to overclock should not be made for you and will leave it to you to decide to implement it. So we have shipped Barebones with stock clock settings. However, should you choose to overclock, it is easy for you to do.
We have provided some suggested settings to use, so should you choose to overclock your Pi, it is a relatively straightforward process.
Please note that overclocking your Pi will invalidate any warranty that you may have. You do so at your own risk. We will not be held accountable for any damage caused by overclocking, so please make sure you are comfortable with the risk before proceeding.
The overclock settings can be found in /boot/config.txt. Open the file up in a text editor and scroll down near the bottom of the file where you will see the following section:
# Uncomment to overclock the arm. 700 MHz is the default.
# Be advised that overclocking your Pi is done at your
# own risk and will invalidate your warranty.
#over_voltage=6
#arm_freq=2000
#gpu_freq=700
#force_turbo=1
#gpu_mem=256
The hash # at the start of each line means that the line is considered a "comment" for annotation purposes so will be ignored by the system. Remove the # from the beginning of the five lines of settings to "uncomment" them, ensuring that you leave the # in place for the three lines above that form the description. The result should look like this:
# Uncomment to overclock the arm. 700 MHz is the default.
# Be advised that overclocking your Pi is done at your
# own risk and will invalidate your warranty.
over_voltage=6
arm_freq=2000
gpu_freq=700
force_turbo=1
gpu_mem=256
Once done, save and exit the file. When you next reboot your Pi the overclock will be in place.
We should note that not all Pi4 boards are created equal so some Pis might be able to stand up to more aggressive settings, and others might require a little dialling back. The settings we provide should be good for most Pis, but are provided as an example only. Please do some research into overclocking to find your ideal settings. Some users have reported some crashes with the provided settings, if you do then consider changing the gpufreq to gpufreq=650 which might be more universally reliable.
This isn't a magic fix for all games however. Some games just don't run well on the pi no matter what we do.


