Model2
Model 2 Emulator is a closed source Sega Model 2 emulator for Windows written by Miguel Ãngel Horna, otherwise popularly known by his nick "ElSemi".
Video Setup Guide
Downloads
Model 2 Emulator
Demulshooter
Model 2 Sinden Bezel Pack
Example Launch Script
Example Text for Batch File:
Start C:\YOUR DEMUL SHOOTER DIRECTORY\DemulShooter.exe -target=model2 -rom=ROM NAME

Start C:\YOUR SEGA MODEL 2 EMU DIRECTORY\emulator_multicpu.exe - ROM NAME
White Flash removal scripts
HOTD
HOTD: HERE
VCOP
VCOP 1&2: HERE
Demulshooter
Demulshooter now comes with White Flash removal scripts built in Details HERE
Troubleshooting
Crashes
- If you have any issues with the emulator crashing check the DX run times are installed on your machine, you can use the web installer to download all required runtimes: https://www.microsoft.com/en-gb/download/details.aspx?id=35
- If you have issues with the emulator crashing or minimising when you shoot near the edge of the screen or while performing a offscreen reload you may need to install the border fix by ramjet (Seems to be a issue with older versions of Windows 7 & XP): http://forum.arcadecontrols.com/index.php?topic=121412.0
Letterbox Mode
If you have issues with not being 4:3 letterbox mode when in fullscreen please check your Nvidia Control Panel settings are set to Aspect Ratio
Fine tuning calibration:
See this video for detaols:
Screen tearing/Texture flicker
If you see graphics issues mainly horizontal misalignments in textures make sure the option ForceSync is turned on within the ‘’emulator.ini’’ file.
ForceSync = 1
Written Guide (Windows 7 test machine)
THE BASICS
(1) Download and extract the Model 2 Emulator v1.1a from HERE
(2) FOR 2 Player - Download and setup DemulShooter as described in the video and links above
(3) Before running the emulator open the EMULATOR.ini file with a text editor
(4) Set your [RomDirs] to the location of your games (These will be .zip format with mame style shortnames) My rompath is shown here, but yours will likely be different. Remove the ';' at the beginning of the Dir1 line.
(5) Emulator Settings.
ForceSync=1 [should be set if your having trouble with screen tear]
WideScreenWindow=0 or 1 or 2 [ 0=4:3 correct aspect fullscreen | 1=Stretched 16:9 fullscreen | 2=Stretched 16:10 fullscreen] - Only works with GUI set resolutions, if using modern resolutions (1920x1080) this will have no effect and LUA scripts are required.
FullScreenWidth=[Native width of your monitor]
FullScreenHeight=[Native height of your monitor]
DrawCross=0 or 1 [Enable or disable crosshairs, NOT compatible with DemulShooter, set to 0 and check the DemulShooter wiki for installing crosshairs if you want them]
UseRawInput=0 or 1 [Limited functionality - It locks the mouse to the gamescreen preventing issues when shooting offscreen or edges and allows 2player mouse but is buggy]
- Mouse ID's change randomly after reboots and unplugging the ID number set as RawDevP1/P2 may need changing
- SET to 0 and Use DemulShooter for 2 player
- SET to 1 For 1Player if your happy to adjusts Mouse ID's AND are having issues with shooting offscreen and the emulator closing
- SET to 0 for 1Player and if having issues with shooting offscreen closing the emulator use RamjetM2Borderless program
(6) Once you have updated the EMULATOR.ini you can launch the emulator and test your games launch. Either the EMULATOR.exe or emulator_multicpu.exe can be used to run the games.
Generally the multicpu program can be used as your default. You will be presented with the Model2 emulator gui.
Open the "Emulator" tab and "Load Rom" to test your games load
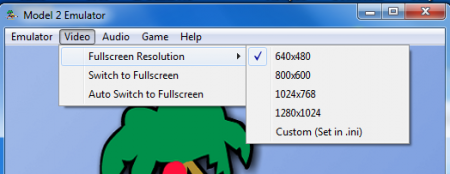
(7) The next step is understanding the video settings.
As you can see there are only a few options for full screen
4:3 aspect ratio 640x480 / 800x600 / 1024x768
1280x1024 is 5:4 aspect ratio. 5:4 is closer to native AR of the Model2 arcade hardware (496x384)
Custom (Set in .ini) = the resolution set in EMULATOR.ini. Your displays resolution (1920x1080 for example)
Note. As mentioned step (5) the Widescreen setting in EMULATOR.ini only works with GUI listed resolutions, higher resolutions require LUA scripts to run in HEATHEN mode of stretched widescreen
Switch to Fullscreen = loads the game in borderless exclusive fullscreen (Win7) so the Sinden border may not display. LUA scripts are required for the border in this case.
Auto Switch to Fullscreen = will load games automatically in fullscreen while option is ticked. (use once all testing is fininshed)
If you can not get the sinden border to display you can use the borders supplied in the Sinden Software package.
You will find a folder called scripts containing LUA files which need to be put into the scripts folder in the M2 emulator folder.
You will also find some PNG files that need to be put inside the main M2 folder with the exe file.
(8) Controls are faily self explainatory, we will need the test menu for gun calibration
Controls can only be setup after a game is launched.
(9) The Test menus of Model 2 Lightgun games are very important for calibration of the lightguns. Its best to spend some time getting your calibration spot on before playing, calibration success will depend on how you play your games onscreen (Fullscreen/windowed/4:3/16:9 etc)
I will comment more about calibration when I write up the LUA widescreen script information.
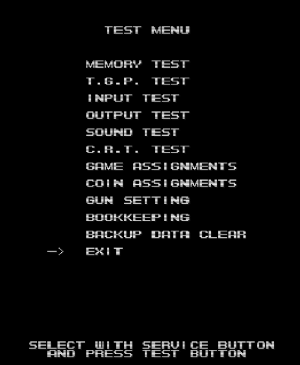
Access the test menu by pressing the TEST button assigned under controls. Mine is F2
Navigate with the buttons described onscreen (Scroll with Service button (F1) and Select with Test (F2) button for example)
(HOTD Test Menu)
From here you can set the game region, test Inputs and calibrate your gun/guns
(10)
Manual Gun Calibration will give the most accurate results.
Refer to this video by cybercade 2099 for fine tuning your calibration
https://youtu.be/SKspPHrkcTk?t=248
Once all setup is complete you can exit Test menu. Your settings will be saved to the NVDATA folder.
Two Player Setup with DemulShooter
(1) DemulShooter (DS) is required for 2 player on the Model 2 emulator. Follow the links at the top of this page for DemulShooter setup and watch the video above.
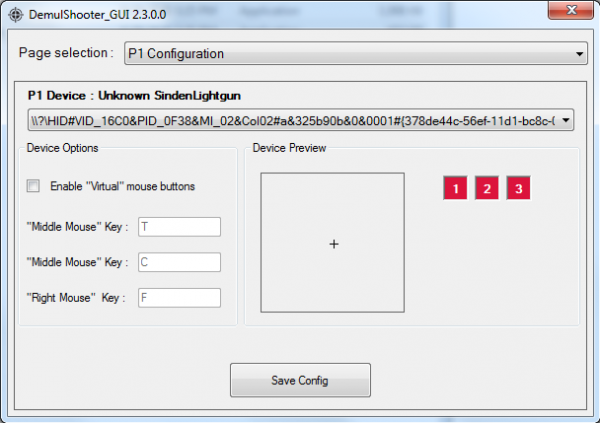
Quick overview, install the DS software and assign P1 and P2 to the USB hardware ID of your guns.
Once your guns are set, use a Per Game Batch file to launch DS before launching your game
SEE notes in step 5 of The Basics section above
(2) With DS now taking over mouse control default crosshairs generated by M2 emulator are automatically disabled.
You can regain crosshairs by installing them from within the DS software. Optionally with DemulShooter_v10.1.5 onwards you can disable the white flash of HOTD and VCop games. White flash can also be disabled directly with a standard LUA script
IF YOU HAVE SCRIPTS already installed please back them up before installing the crosshairs from DS. Your scripts will be overwritten
- More to follow.....
Topics to be detailed
GUI+launching games (screen res)ControlsIn-game test menusDemul 2 player setup- Demul Crosshair installation
- LUA Scripts
- LUA - Sinden Border
- LUA - Scanlines
- LUA - Widescreen scripts + Sinden software settings and in game calibration
- LUA - NoFlash patch
- RamjetRBorderless for offscreen reload/minimising issues


