Difference between revisions of "Flycast (Windows)"
| (17 intermediate revisions by 2 users not shown) | |||
| Line 15: | Line 15: | ||
by :Bratwurstmensch | by :Bratwurstmensch | ||
| − | === General | + | |
| + | '''<u>NOTE</u>:''' This guide was created using Flycast v1.3 | ||
| + | |||
| + | === General Setup === | ||
Your BIOS files need to go into the emulator subfolder "data“. | Your BIOS files need to go into the emulator subfolder "data“. | ||
| Line 26: | Line 29: | ||
Uncheck "Hide Legacy Naomi Roms“. You can set these here if you want to use automatic load/save states. | Uncheck "Hide Legacy Naomi Roms“. You can set these here if you want to use automatic load/save states. | ||
| − | === Controls | + | === Controls === |
Check "Use Raw Input". | Check "Use Raw Input". | ||
At "Dreamcast Devices“, set Device A and B to "Light Gun“. Choose "Sega VMU“ next to those entries – your game saves are stored there. You can check/uncheck crosshairs here. | At "Dreamcast Devices“, set Device A and B to "Light Gun“. Choose "Sega VMU“ next to those entries – your game saves are stored there. You can check/uncheck crosshairs here. | ||
| − | All connected physical devices, including your Sinden gun, should show up under "Physical Devices“ with their device ID. To find out about your right device ID, you can look that up in the DemulShooter | + | All connected physical devices, including your Sinden gun (mouse & keyboard), should show up under "Physical Devices“ with their device ID. |
| + | |||
| + | Each Sinden lightgun will show up as 2 devices - ''Mouse'' and ''Keyboard'', and should be mapped accordingly. | ||
| + | |||
| + | To find out about your right device ID, you can look that up in the DemulShooter GUI for example. | ||
* '''<u>NOTE</u>''': The latest version of Flycast v2.0 no longer displays the device ID's. You can use v1.3 to find the device ID's which will list the connected devices in the same order. | * '''<u>NOTE</u>''': The latest version of Flycast v2.0 no longer displays the device ID's. You can use v1.3 to find the device ID's which will list the connected devices in the same order. | ||
| − | + | [[File:Flycast Device IDs.png|none|thumb|Device ID's]] | |
| − | Set your first gun to Port A and your second gun to Port B. Make sure to set up both Mouse and Keyboard, as you will need both to bind buttons. | + | Set your first gun to Port A and your second gun to Port B. Make sure to set up both Sinden Mouse and Sinden Keyboard, as you will need both to bind buttons. |
Your Tab should look like this (with different Devices / IDs listed): | Your Tab should look like this (with different Devices / IDs listed): | ||
| Line 47: | Line 54: | ||
=== ''Mouse VID_(…):'' === | === ''Mouse VID_(…):'' === | ||
| − | === <u> | + | ====<u>Dreamcast Controls</u>==== |
Start: Middle Button (recommended: Front left side button of Sinden gun) | Start: Middle Button (recommended: Front left side button of Sinden gun) | ||
| − | A | + | A Button: Left Button (Trigger onscreen) |
Reload: Right Button (Trigger offscreen) | Reload: Right Button (Trigger offscreen) | ||
| + | |||
| + | ==== <u>Arcade Controls</u> ==== | ||
| + | Button 1: Left Button (Trigger onscreen) | ||
| + | |||
| + | Button 2 (for reload): Right Button (Trigger offscreen) | ||
| + | |||
| + | * Ninja Assault uses Reload button instead of Button 2 for reload. | ||
=== ''Keyboard VID_(…):'' === | === ''Keyboard VID_(…):'' === | ||
| − | === <u>Dreamcast Controls | + | ====<u>Dreamcast Controls</u>==== |
DPAD buttons should already be mapped to Up, Down, Left, Right. | DPAD buttons should already be mapped to Up, Down, Left, Right. | ||
B: Rear left side button of Sinden gun, Space, for example | B: Rear left side button of Sinden gun, Space, for example | ||
| − | === <u>Arcade Controls | + | ====<u>Arcade Controls</u>==== |
DPAD buttons should already be mapped to Up, Down, Left, Right. | DPAD buttons should already be mapped to Up, Down, Left, Right. | ||
| Line 72: | Line 86: | ||
It´s also important to bind the Service and Test buttons for calibration. You can bind these buttons to your keyboard or a connected regular controller (shoulder buttons are mapped as default) as you please. | It´s also important to bind the Service and Test buttons for calibration. You can bind these buttons to your keyboard or a connected regular controller (shoulder buttons are mapped as default) as you please. | ||
| − | === Video === | + | === <u>Video</u>=== |
You can leave most of these settings at the default values. | You can leave most of these settings at the default values. | ||
| Line 78: | Line 92: | ||
For newer graphics cards, check "Vulkan“ for better performance. | For newer graphics cards, check "Vulkan“ for better performance. | ||
| + | |||
| + | * Try different Graphics API's if you have issues with the Sinden border showing on top. | ||
Increase internal resolution; 4K works very well for example. | Increase internal resolution; 4K works very well for example. | ||
| Line 87: | Line 103: | ||
That´s it. Choose your game in the "Games“ view of Flycast. | That´s it. Choose your game in the "Games“ view of Flycast. | ||
| − | === AHK | + | === <u>Full Screen</u> === |
| + | Press Alt + Enter on your keyboard to switch from windowed to full screen. | ||
| + | |||
| + | === <u>AHK Scripts</u> === | ||
If you want to use AHKs to combine Flycast with your lightgun software for frontends, for example, use this script to bootup Flycast with the rom file: | If you want to use AHKs to combine Flycast with your lightgun software for frontends, for example, use this script to bootup Flycast with the rom file: | ||
<syntaxhighlight lang="ahk"> | <syntaxhighlight lang="ahk"> | ||
| Line 102: | Line 121: | ||
* Manic Panic Ghosts! / Pokasuka Ghost! | * Manic Panic Ghosts! / Pokasuka Ghost! | ||
| − | ===Game Notes=== | + | ===<u>Game Notes</u>=== |
| − | |||
| + | ==== Big Car Hunter ==== | ||
There is an unlockable mini-game called "Big Car Hunter" in the Dreamcast game "Demolition Racer: No Exit", which can be played with a lightgun. | There is an unlockable mini-game called "Big Car Hunter" in the Dreamcast game "Demolition Racer: No Exit", which can be played with a lightgun. | ||
| Line 110: | Line 129: | ||
In order to play this, go into your control settings, choose a gamepad in Port A, and your lightgun in Port D. You find the game in the Extras menu. | In order to play this, go into your control settings, choose a gamepad in Port A, and your lightgun in Port D. You find the game in the Extras menu. | ||
| + | |||
| + | ====Extreme Hunting 2==== | ||
| + | This Atomiswave game has been "fixed" and is now confirmed working in flycast versions after 15th Feb 2023 | ||
| + | |||
==== House of the Dead 2 ==== | ==== House of the Dead 2 ==== | ||
In the Dreamcast version, blood is green by default. To change the blood colour to red, you must beat the game in the original mode. After you beat it, go back to the options menu, and there should be an option to change blood colour. | In the Dreamcast version, blood is green by default. To change the blood colour to red, you must beat the game in the original mode. After you beat it, go back to the options menu, and there should be an option to change blood colour. | ||
| Line 123: | Line 146: | ||
There is a small calibration video tutorial near the end of this video on [https://www.youtube.com/watch?v=qK6bDHuptYI YouTube]. | There is a small calibration video tutorial near the end of this video on [https://www.youtube.com/watch?v=qK6bDHuptYI YouTube]. | ||
| + | |||
| + | ==== Ninja Assault Calibration ==== | ||
| + | |||
| + | * Map the following buttons under '''Arcade Controls''': ''Service'', ''Test'', ''Up'', ''Down'', ''Button 3'' | ||
| + | * Launch the game and wait until it fully loads to the ''Add Credit'' screen. | ||
| + | * Press the ''Test'' button and use the up & down buttons to scroll down to ''I/O Test''. | ||
| + | * Press ''Button 3'' to select/enter. | ||
| + | * Select '''''Gun Initialize''''' for calibration. | ||
| + | |||
| + | ==== Sports Shooting USA Calibration ==== | ||
| + | |||
| + | * This game requires calibration for both P1 and P2 guns, even if you are only using 1 Sinden lightgun. | ||
| + | * You can try assigning your mouse as gun 2 (Port B) or try mapping your Sinden lightgun to both Ports A & B in order to get passed the calibration screen. | ||
[[Category:Emulators PC]] | [[Category:Emulators PC]] | ||
Latest revision as of 19:04, 12 April 2024
Flycast is a multi-platform Sega Dreamcast, NAOMI, and Atomiswave emulator.
Unlike Demul, Flycast supports RAW Input to handle multiple mice and works without background tools like DemulShooter, Reshade and No Mousey. Therefore it is far easier to setup for two players and has superior rendering options as well.
Flycast Standalone emulator setup guide
by :Bratwurstmensch
NOTE: This guide was created using Flycast v1.3
General Setup
Your BIOS files need to go into the emulator subfolder "data“.
Ensure your guns are connected, and the Sinden software is running before booting up Flycast.
Edit the settings tabs by running the emulator and clicking "Settings“.
Choose your preferred language and region settings as preferred. Set Cable to "VGA“ and add as many folders to locate your ROM-files as you need.
Uncheck "Hide Legacy Naomi Roms“. You can set these here if you want to use automatic load/save states.
Controls
Check "Use Raw Input".
At "Dreamcast Devices“, set Device A and B to "Light Gun“. Choose "Sega VMU“ next to those entries – your game saves are stored there. You can check/uncheck crosshairs here.
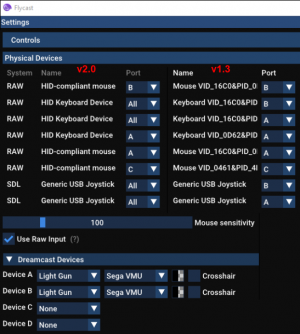
All connected physical devices, including your Sinden gun (mouse & keyboard), should show up under "Physical Devices“ with their device ID.
Each Sinden lightgun will show up as 2 devices - Mouse and Keyboard, and should be mapped accordingly.
To find out about your right device ID, you can look that up in the DemulShooter GUI for example.
- NOTE: The latest version of Flycast v2.0 no longer displays the device ID's. You can use v1.3 to find the device ID's which will list the connected devices in the same order.
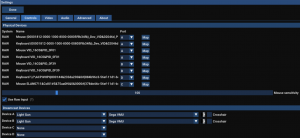
Set your first gun to Port A and your second gun to Port B. Make sure to set up both Sinden Mouse and Sinden Keyboard, as you will need both to bind buttons.
Your Tab should look like this (with different Devices / IDs listed):
Click "Map" per gun and bind your buttons. While having a DPAD, the Dreamcast Gun only had a B and Start buttons. The A Button was used for the Trigger. Therefore there are luckily not many buttons to bind.
To switch between Dreamcast and Arcade, use the Dropdown menu to the right.
Mouse VID_(…):
Dreamcast Controls
Start: Middle Button (recommended: Front left side button of Sinden gun)
A Button: Left Button (Trigger onscreen)
Reload: Right Button (Trigger offscreen)
Arcade Controls
Button 1: Left Button (Trigger onscreen)
Button 2 (for reload): Right Button (Trigger offscreen)
- Ninja Assault uses Reload button instead of Button 2 for reload.
Keyboard VID_(…):
Dreamcast Controls
DPAD buttons should already be mapped to Up, Down, Left, Right.
B: Rear left side button of Sinden gun, Space, for example
Arcade Controls
DPAD buttons should already be mapped to Up, Down, Left, Right.
Button 2: Rear left side button of Sinden gun, Space, for example
Start: 1 (2 for player 2)
Coin: 5 (6 for player 2)
It´s also important to bind the Service and Test buttons for calibration. You can bind these buttons to your keyboard or a connected regular controller (shoulder buttons are mapped as default) as you please.
Video
You can leave most of these settings at the default values.
Check "Widescreen“ if you want to make use of widescreen rendering. It doesn´t affect your alignment, but consider that you cannot shoot outside of the 4:3 rendering area which can be distractive for some players.
For newer graphics cards, check "Vulkan“ for better performance.
- Try different Graphics API's if you have issues with the Sinden border showing on top.
Increase internal resolution; 4K works very well for example.
If you want to use HD texture packs (there is one for Confidential Mission, The House of the Dead 2 and Demolition Racer: No Exit) you can check that box as well and create a subfolder "textures“ to put them there.
You can skip the other tabs as you don´t need to change anything there.
That´s it. Choose your game in the "Games“ view of Flycast.
Full Screen
Press Alt + Enter on your keyboard to switch from windowed to full screen.
AHK Scripts
If you want to use AHKs to combine Flycast with your lightgun software for frontends, for example, use this script to bootup Flycast with the rom file:
Run, YOUR_PATH\flycast.exe "ROMPATH\House of the Dead 2 (US).chd"
Non-working games in Flycast
Make sure you do NOT use Dreamcast-converted arcade games; these conversions will not work.
These lightgun games do currently not work in Flycast yet; use Demul for these:
- Brave Firefighters
- Extreme Hunting 2
- Manic Panic Ghosts! / Pokasuka Ghost!
Game Notes
Big Car Hunter
There is an unlockable mini-game called "Big Car Hunter" in the Dreamcast game "Demolition Racer: No Exit", which can be played with a lightgun.
To take a shortcut and unlock it right away, just inject a 100% save game and inject it to your VMU with a tool like vmuexplorer.
In order to play this, go into your control settings, choose a gamepad in Port A, and your lightgun in Port D. You find the game in the Extras menu.
Extreme Hunting 2
This Atomiswave game has been "fixed" and is now confirmed working in flycast versions after 15th Feb 2023
House of the Dead 2
In the Dreamcast version, blood is green by default. To change the blood colour to red, you must beat the game in the original mode. After you beat it, go back to the options menu, and there should be an option to change blood colour.
Mazan: Flash of the Blade
A very interesting title that is also supported by Flycast.
This is no "real" gun game because you´re supposed to swing a sword. But the gun can be calibrated to control the sword onscreen very accurately.
The sword will only show up after calibration in the service menu. You need to follow the instructions on the calibration screen and keep the pointer in the corners for a few seconds.
After succeeding, a small point will show up. The sword should show up in-game now, and you can slice over the screen to play the game.
There is a small calibration video tutorial near the end of this video on YouTube.
Ninja Assault Calibration
- Map the following buttons under Arcade Controls: Service, Test, Up, Down, Button 3
- Launch the game and wait until it fully loads to the Add Credit screen.
- Press the Test button and use the up & down buttons to scroll down to I/O Test.
- Press Button 3 to select/enter.
- Select Gun Initialize for calibration.
Sports Shooting USA Calibration
- This game requires calibration for both P1 and P2 guns, even if you are only using 1 Sinden lightgun.
- You can try assigning your mouse as gun 2 (Port B) or try mapping your Sinden lightgun to both Ports A & B in order to get passed the calibration screen.


